Friday, January 16, 2009

Fresh Fruit Salad

Fruit Salad Pictures, Images and Photos

Fruit Salad, also known as Macedonia, has been around since the 19th century. It is a dish consisting of different varieties of fruit served in their own juices or with syrup. It can be served as an appetizer, side-salad, or a dessert. It also makes a wonderful snack. There are many benefits to making your own fruit salad opposed to buying it already made. You can select fruits that you enjoy and you can control the sugar content. You can create a fancy Waldorf salad or a simple blend of your favorite fruits. Here are a few of my favorite fruit salad recipes.

Fresh Fruit Salad

5 to 6 cups of a variety of fresh fruits
of your choice such as:
Bananas, peeled and sliced
Blueberries
Seedless Grapes
Kiwi, peeled and sliced
Pears, pealed and sliced
Peaches, peeled and sliced
Raspberries
Sliced Pineapple
Cantaloupe
Cherries
1 lemon – remove zest and juice
1 lime – remove zest and juice
1 orange – remove zest and juice
1 egg, well beaten
1 cup of sugar

  1. In a saucepan over medium heat, combine the zest and juice from the lemon, lime, and orange.
  2. Add the beaten egg and sugar.
  3. Cook, stirring constantly, until mixture comes just to a boil; let boil 1 minute still stirring constantly.
  4. Remove from heat and let cool.
  5. In a large bowl combine all of your fruits.
  6. Pour the cooled sauce over the fruit and lightly toss until the fruit is coated.
  7. Cover and refrigerate for at least 2 hours before serving.
  8. Enjoy!

Wacky Waldorf Salad
Here is a delicious twist on the traditional Waldorf salad.
6 Granny Smith Apples, cored and thinly sliced
5 ribs of celery, thinly sliced
1 cup chopped walnuts
1/3 cup Greek Yogurt
6 tablespoons pomegranate seeds
  1. Combine all of the ingredients in a large bowl and serve chilled.

Thursday, January 15, 2009

5 Cold Fighting Foods

Chicken Soup Pictures, Images and Photos

It is the start of a new year and we are getting to the start of the Cold and Flu Season. Of course we will all want to take caution to avoid being sick. But if it does happen you should be ready, and will be ready with these five remedies you can find in your own kitchen!


  1. Yogurt - This one is more preventative rather than a remedy for the cold. You should try to include yogurt in your daily diet because there are so many health benefits. It doesn't take a lot, just one 8 oz serving can give you many great health benefits. For starters, the beneficial bacteria in some active yogurt cultures will actually boos your immune system help prevent colds. It is an excellent source of protein, calcium, riboflavin and vitamin B 12. When yogurt is compared to milk, yogurt contains more calcium and protein because of the added cultures in the yogurt. So you can see why it can be such a wonderful addition to your diet.
  2. Chicken Soup - It would be wrong for me not to list Chicken Soup. It's not just a comfort food anymore! Interestingly enough, scientific evidence supports what many have always believed. Chicken Soup has healing properties. Chicken Soup was first prescribed by a 12th century physician named Moses Maimonides. The steam helps relieve congestion. Ingredients commonly added to the soup, such as garlic and pepper work like most cough medicines by thinning out the mucus making breathing easier. The fat in the broth helps sooth your throat. And of course, it is a comfort food that can always make you feel a little better.
  3. Honey - Honey is wonderful for a cold or even just a sore throat. You can add it to your tea or just eat a spoonful. It helps coat your throat and has been proven in a study in the Archives of Pediatrics & Adolescent Medicine that honey as more effective in relieving coughs than over the counter cough medicines. It also has mild antibiotic effects.
  4. Pineapple Juice - I know this one might sound a bit odd... but hear me out. When you are sick it is important to stay hydrated. You'll also want to make sure to get some extra Vitamin C. Pineapple Juice is the perfect solution because it is less acidic than orange juice making it gentler on the stomach and it has the same amount of Vitamin C. It also contains an enzyme called Bromelain. Bromelain will help with aches and pains associated with your cold. It is also anti-inflammatory and will help sooth a sore throat and swollen glands. So as strange as it sounds... Pineapple Juice is great for a cold!
  5. Garlic - What can I say? Garlic is amazing it can cure just about everything and has been used for thousands of years for it's benefits to the immune system. It has antibiotic properties and is directly effective against viruses. It also doesn't hurt that it is anti-fungal, and anti-parasitic.
Hopefully you will stay well this cold season. But if you do become ill I hope that these five foods will help make you feel better.

I'm Back!

Sorry it has been so long. But, with the holidays and the start of a new year things have been a little crazy. But now that things are calming down I'll be able to start writing more often!

Monday, December 8, 2008

Make Your Next Holiday Party A Cookie Exchange

Cookies Pictures, Images and Photos


Last night I attended my first cookie exchange party. It was a really cute concept. Each person bakes a dozen cookies for each person attending and everyone exchanges cookies. For example if 7 people are attending you would bake 7 dozen cookies. Now you may think that it might be a little expensive for only one party, but the beauty of it is that you don't loose anything. You come with 7 dozen cookies and go home with 7 dozen different cookies. When choosing cookies to exchange it is best to be creative and bake something other than the basic chocolate chip. It is a chance to experiment and have fun. You'll also get to try different variations of cookies you enjoy. :)

Sunday, December 7, 2008

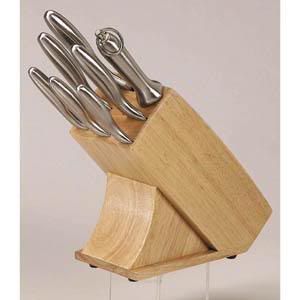
Chicago Cutlery Forum Knife Collection

knife


The Chicago Cutlery Forum 8-Piece Knife Block Set is an amazing set of knives. My parents gave them to me for Christmas a few years ago and I absolutely love them. These are great knives because they are high carbon stainless steel, they come with a block and a steel, and they have a lifetime warranty.
These knives were designed to be held comfortably with a curve in the handle which makes holding them very natural. They are very strong with the knife being one solid piece of stainless steel they are also very sharp.

When I first opened the box and took out the knives and the block, I was very satisfied with the appearance. They have a very elegant look to them and look lovely in the block. When I felt the blade I was a little disappointed that it felt dull. After taking some time to sharpen my knifes I was very satisfied. They have a very comfortable grip and are just the right weight.
After I cleaned my knives I tried them out on different foods. I broke it down per knife so you could really get to know the set.

  1. The Chef Knife -This is my second favorite knife, It is the perfect size and weight and I feel very comfortable cutting with it. This knife is great for cutting up fruits, vegetables, and meats. It is the knife I use most often and it is very practical.
  2. The Serrated Slicer - This is my favorite knife, it makes cutting a breeze. I can use it for simple tasks such as cutting bread but then I I can also use it to cut more difficult items such as baking chocolate and tomatoes. An amazing feature of serrated knives is that you do not have to sharpen them and they never go dull.
  3. The Utility Knife - Honestly, I am not a big fan of this knife although people tell me this is a great knife for tomatoes, I actually have better luck with the serrated slicer. I have never found a good use for it because I can accomplish most tasks with my chef knife.
  4. The Paring Knife - This knife is great for small tasks such as cutting shrimp. It also is great for little projects such as radish roses. I feel very comfortable using it and the blade is not too small. It is very easy to handle.
  5. Tourne Knife -This knife is very useful to create decorative garnishes and to peel the skin off of soft fruits. It is also excellent for removing blemishes. The only problem I have experienced with this knife is that it is very difficult to sharpen. I have actually cut myself in the process of attempting to.

After two years of care these knives are still in great shape and would be a great addition to any kitchen. You'll want to make sure to hand wash them and dry them completely before replacing them in the block. But if your knives do start to rust their is a lifetime warranty on these knives which also make them very appealing when shopping around for a set of new knives.


http://rcm.amazon.com/e/cm?t=coowitkat-20&o=1&p=8&l=as1&asins=B00091SDIG&fc1=000000&IS2=1&lt1=_blank&m=amazon&lc1=0000FF&bc1=000000&bg1=FFFFFF&f=ifr

Five Fun Kitchen Gadgets

The kitchen is where I feel the most at home. There is something relaxing about being there and cooking a meal to enjoy. I could go on for hours about why I love to cook, but I'll make it short and sweet and talk about one of my loves... Kitchen Gadgets! Of course when stocking your kitchen you'll want to start with the basics but there are plenty of fun ones you won't want to be without.


  1. Adjustable Measuring Cups - I could go on and on about how amazing these are... If you are baking and you need to measure out a lot of ingredients than this is perfect because you don't have to dirty up all of your measuring cups. They are dishwasher safe making them even more convenient. There are a lot of different brands but most are approved for both liquid and dry ingredients.
  2. HowManyDaysAgo Timer -These are cute and can save you from potential food poising. This little gadget eliminates all of the guess work on how long ago you put that Tupperware dish in the refrigerator.
  3. Hands Free Can Opener - This is a great gadget because it not only is amusing but you can multitask because your hands are free and it provides you with a clean cut, eliminating those sharp edges so it is extremely kid friendly. It runs on two AA batteries and they will last about 100 cans. This makes it convenient because you can take it anywhere, such as camping or boating trips.
  4. Cuisinart Soft Serve Ice Cream Maker - Nothing says fun like Ice Cream! There are plenty of ice cream machines on the market, but none of them make soft serve ice cream. This machine produces professional soft serve ice cream, yogurt, sorbet, or sherbet. All you do is add the ingredients. No more struggling with rock salt and other chemicals. It makes about 1.5 quarts in as little as twenty minutes.
  5. Silicone Bakeware - From bunt cakes to muffins Silicone Bakeware won't leave you disappointed. You no longer have to worry about your cakes sticking to the pan or about burning your hands on the pan. They are lightweight, non-stick, rust proof, flexible, unbreakable and very easy to use and store. Never again will you have the inconvenience of flouring and greasing your pans... but you will have to watch the time because sometimes the items bake quicker in silicone.

Hopefully you'll have as much fun as I do with these kitchen gadgets... and there will be more to come :)

Who Was Betty Crocker?

Like many of you I'm sure, I grew up with Betty Crocker in my kitchen. With all of her cooking products and cookbooks I would have never imagined that she wasn't a real woman. A few years ago I remembered someone telling me that Betty wasn't an actual person but just a name. Well boredom sunk in so I started doing some research and I was amazed to find it was true.

In 1921 The Washburn Crosby Company created Betty Crocker to give a more personalized response to consumer questions. The name Betty was chosen because it sounded warm and wholesome and Crocker was borrowed from a retired executive.

Surprisingly this fictional woman was the host of the nation's first cooking show, "The Betty Crocker Cooking School of the Air." Women from different cities became the voice of Betty for twenty-four years making it the one of the longest airing radio broadcast shows in history. People would sign up for the classes and try out recipes. Students would then mail in letters telling their results and receive a certificate. Although different women were doing the broadcasts the same script was used for each station.

Betty finally received a face in 1936 when an artist created an image made up from features of seventy-five real women. This image allowed consumers to believe that Betty Crocker was in fact a real woman. According to Fortune in 1945, she was voted as America's second most famous woman with Eleanor Roosevelt being the first.

In only twenty-four years, Betty Crocker had become a household name. As time went by Betty came into peoples homes in a new and exciting way with her own TV show, "The Betty Crocker Search for the All-American Homemaker of Tomorrow," with Adelaide Hawley staring as Betty. Betty was also becoming popular with her line of cookbooks and cake mixes. Over the years she has published over two hundred cookbooks, several food products, and even bake ware such as the "Betty Crocker Bake N' Fill" cake pans.

This non-existent woman has accomplished so much, more than most people ever do in their lifetimes. It is hard to believe that she never truly existed. But if you think about it although Betty Crocker doesn't exist, she reminds me of someone who has made a name for herself in the past few years... Martha Stewart.

Thursday, December 4, 2008

The History of the Doughnut

dough nut


1847 was a magical year, it was the year the doughnut was created by Hanson Gregory, a sixteen year old American boy. Fried cakes were already popular at the time, but it was difficult to fry the centers of the cakes all the way through. This made them dangerous to eat because the uncooked center often carried bacteria. His mother was a baker who would try to hide the doughy centers by covering them with nuts. Hanson found this to be undesirable and he got the idea to punch a hole in the center of the dough before frying it. The problem was solved and a new fried cake was born, the doughnut! Over time the doughnut has evolved from the traditional ring style, to doughnuts filled with jam and cream, and even the cute and delicious doughnut hole.

Here are some delicious doughnut recipes to try:


10 Minute Doughnuts

1 Can Pillsbury Biscuit Dough (Regular)
Cooking Oil (Enough to cover the dough)
Confectioners
Sugar
Milk


  1. Heat the cooking oil in a deep frying pan
  2. Separate the dough and cut out the centers.
  3. Place dough into pan then immediately begin to flip them over with a spatula or other flipping instrument of your choice.
  4. Once the dough is a light golden brown, place on a cooling rack
  5. Pour about a cup of confectioner's sugar into a bowl. Slowly whisk in milk until you reach desired consistency.
  6. Dip Doughnuts into the glaze, let the excess drain off and enjoy!

White Chocolate Doughnuts

3 1/4 cups flour
2 tsp baking powder
1/4 tsp salt
2 beaten eggs
2/3 cup sugar
2 ounces melted white chocolate
2 tbsp melted butter
1/2 cup milk
1 tsp vanilla
1 cup chocolate glaze
1 cup chopped macadamia nuts

  1. Preheat the fryer. In a mixing bowl, sift the flour, baking powder and salt together.
  2. In a separate mixing bowl, whisk the eggs and sugar together. Next add the melted chocolate and butter and stir in the milk and vanilla.
  3. Slowly add the sifted flour into the egg mixture, and incorporate into a soft dough. Cover the dough and chill for 2 hours.
  4. Turn the dough out onto a floured surface. Roll the dough out to 1/2-inch thick. Cut the doughnut holes out, using a small round cookie cutter.
  5. Fry a couple of doughnuts at a time for about 1 minute on each side.
  6. Remove the doughnuts from the fryer and drain on a paper-lined plate. Place the doughnuts on a wire rack.
  7. Drizzle the warm doughnuts with the chocolate glaze and sprinkle with the macadamia nuts. Place the doughnuts on a platter.

Who Was Duncan Hines?

duncan hines


This post isn't directly about cooking but is a fun insight to a man many have heard of but few really know... Duncan Hines.

Duncan Hines was born on March 26, 1880 in Bowling Green, Kentucky. Later in life he west due to his asthma and eventually became a salesman for a Chicago Printing Press. During his years as a salesman he traveled and eventually became familiar with different restuarants and hotels throughout the country. In the time before McDonald's and Burger King and other major chains finding a good place to eat became a quite the task. He started to take notes of the great places he found to dine and lodge and eventually started to share his lists with his friends and family. The response to these lists became so positive that in 1935 he self-published a book called "Adventures in Good Eating."

About two years later he published a second edition. The businesses listed in his books were very happy with his books because it brought them new business. Consumers often kept one of his books in their glove box so when they would take trips they could find the best establishments along the way. The businesses that were included on Hines' list were allowed to post a sign saying "Recommended by Duncan Hines" in their windows. After being added to the list, businesses were expected to maintain their quality or they would be taken off of the list.

In the 1950's Duncan Hines sold the rights to his name and the title to his book to a newly formed company Hines-Park Foods, Inc. This new company was focused on providing high quality foods to the American Consumers. A few years later Hines-Park Foods was producing over two hundred and fifty different products featuring the Duncan Hines label.

In 1956, Hines-Park Foods was purchased by Procter & Gamble. Shortly after, Duncan Hines introduced their now famous
cake mixes, which were marketed nationwide along with many other items under the Duncan Hines name.

Duncan Hines died at the age of 79 on March 15, 1959. Forty-eight years after his death, to this day Duncan Hines is still a household name. Over the years the brand has represented excellent quality in baking mixes and is currently the nation's second largest baking mix companies. The label is also one of the most recognized trademarks in the country. Even though "Adventures in Good Eating" hasn't been published for over forty-five years, there are still some establishments that still proudly display their signs saying "Recommended by Duncan Hines."

6 Things to Consider when Giving a Cassarole as a Gift

Photobucket

The cold weather is here... and what gift could be more wonderful or thoughtful than a casserole? With the cold weather comes sickness and a casserole can be the perfect way to show someone you are thinking of them when they aren't feeling well.Casseroles range from comfort foods to fun new combinations. Here are a few things that you should keep in mind when presenting one as a gift:

  1. Make sure to consider any food allergies and preferences before making a dish. You should also consider dietary restrictions if they are on medication.
  2. Check to see what other friends are bringing so that they have some variety.
  3. Use a disposable pan so they won't have to worry about remembering who's dish it is and returning it. It will also save them time with dishes.
  4. Include cooking instructions. A lot of people forget to do this simple task.
  5. Do not overcook foods that are going into the casserole because when you reheat the dish you don't want everything to be over cooked.
  6. Don't be afraid to go the extra mile and include side dishes or a nice dessert. During rough times these small acts of kindness can really help.

Now for the fun part, I've included some great casserole recipes for you to try!

Chicken Tetrazzini

1 (8 ounce) package spaghetti, broken into pieces
1/4 cup butter
1/4 cup all-purpose flour
3/4 tsp salt
1/4 tsp ground black pepper
1 cup chicken broth
1 cup heavy cream
2 tbsp sherry
1 (4.5 ounce) can sliced mushrooms, drained
2 cups chopped cooked chicken
1/2 cup grated Parmesan cheese

  1. Preheat oven to 350 degrees F (175 degrees C). Lightly grease a 9x13 inch baking dish.
  2. Bring a large pot of lightly salted water to a boil. Add spaghetti, and cook for 8 to 10 minutes, or until al dente; drain.
  3. Meanwhile, in a large saucepan, melt butter over low heat. Stir in flour, salt, and pepper. Cook, stirring, until smooth. Remove from heat, and gradually stir in chicken broth and cream.
  4. Return to heat, and bring to a low boil for 1 minute, stirring constantly. Add sherry, then stir in cooked spaghetti, mushrooms, and chicken. Pour mixture into the prepared baking dish, and top with Parmesan cheese.
  5. Bake 30 minutes in the preheated oven, until bubbly and lightly browned.

Shepherd's Pie

5 potatoes, peeled and quartered
1 pound lean ground beef
1 (4 ounce) can sliced mushrooms
1 (15 ounce) can mixed vegetables
1 (10.75 ounce) can condensed cream of mushroom soup
1 (10.75 ounce) can condensed cream of celery soup
salt and pepper to taste
3 tablespoons butter

  1. Preheat oven to 350 degrees F (175 degrees C). Coat a 9x13 baking dish with cooking spray.
  2. Bring a large pot of salted water to a boil. Cook potatoes in boiling water until tender, about 15 minutes. Drain, reserving some of the cooking liquid. Mash potatoes with a little of the cooking liquid. Set aside.
  3. In a large skillet, cook ground beef until brown over medium-high heat. Drain fat from pan. Stir in mushrooms, mixed vegetables, mushroom soup, celery soup, and salt and pepper; heat through. Pour into prepared baking dish, cover with mashed potatoes, and dot with butter.
  4. Bake in preheated oven for 30 minutes, or until potatoes are golden and beef and vegetable mixture is hot and bubbly.

Ratatouille

2 tbsp olive oil
3 cloves garlic, minced
2 tsp dried parsley
1 eggplant, cut into 1/2 inch cubes
salt to taste
1 cup grated Parmesan cheese
2 zucchini, sliced
1 large onion, sliced into rings
2 cups sliced fresh mushrooms
1 green bell pepper, sliced
2 large tomatoes, chopped

  1. Preheat oven to 350 degrees F (175 degrees C). Coat bottom and sides of a 1 1/2 quart casserole dish with 1 tablespoon olive oil.
  2. Heat remaining 1 tablespoon olive oil in a medium skillet over medium heat. Saute garlic until lightly browned. Mix in parsley and eggplant. Saute until eggplant is soft, about 10 minutes. Season with salt to taste.
  3. Spread eggplant mixture evenly across bottom of prepared casserole dish. Sprinkle with a few tablespoons of Parmesan cheese. Spread zucchini in an even layer over top. Lightly salt and sprinkle with a little more cheese. Continue layering in this fashion, with onion, mushrooms, bell pepper, and tomatoes, covering each layer with a sprinkling of salt and cheese.
  4. Bake in preheated oven for 45 minutes.

Wednesday, December 3, 2008

Christmas Cookies

Photobucket

The holidays are here! That means it is time for Christmas Cookies. First lets look at the Christmas Cookie in a little more detail. The Germans call them Plätzchen, in Spain they are galletas, and here in America they are the beloved Christmas Cookie. Most Christmas Cookie recipes trace back to the medieval times. By the 1500's they were popular all over Europe. And around 1600 the Dutch and the Germans introduced cookie cutters and molds to America, and they have been a holiday tradition ever since. There are so many to choose from but I have gone through and found some excellent recipes for you this season. Some are new to me and some have been in my family for quite sometime... Enjoy!

The Ultimate Sugar Cookie
3/4 cup Butter-flavored Crisco (shortening)
1 cup sugar
2 eggs
1 tsp vanilla
2-1/4 cups all-purpose flour
1-1/2 tsp baking powder
1/4 tsp salt
Coloured decorations or icing
  1. Cream the Crisco, sugar, eggs and vanilla in large mixing bowl at medium speed with an electric mixer until light and creamy.
  2. Combine the flour, baking powder and salt in a separate bowl.
  3. Slowly add the dry ingredients to creamed mixture, mixing on low speed until well blended.
  4. Cover the dough and chill 1 hour for easy rolling.
  5. Preheat your oven to 375°F.
  6. Roll out half of the dough at the time. Roll out the dough on a lightly floured surface to a 1/4-inch thickness.
  7. Using a cookie cutter cut into desired shapes. And place on ungreased baking sheets.
  8. Reroll leftover pieces and cut into desired shapes.
  9. Sprinkle with coloured decorations or leave plain to decorate when cool.
  10. Bake at 375°F for 8 to 10 minutes, or until edges are light brown. (Time will vary with cookie size.)
  11. Cool slightly, then remove to cooling rack.
Melt Away the Snow Cookies
1 cup butter
1/2 cup sifted powdered sugar
1 tsp vanilla
2 1/4 cups flour
1/4 tsp salt
  1. Preheat your oven to 400°F.
  2. Cream the butter, sugar and vanilla.
  3. Measure flour and salt into a bowl, and slowly blend into butter mixture.
  4. Drop onto cookie sheet.
  5. Bake for 8 minutes.
  6. While warm, dip in confectioners sugar.
Fabulous Party Cookies
1 cup shortening
1 cup brown sugar
1/2 cup sugar
2 tsp vanilla extract
2 eggs
2 1/2 cups flour
1 tsp baking soda
1 tsp salt
1 1/2 cup plain M&Ms
  1. Preheat oven to 375°
  2. Mix shortening, brown sugar, sugar, vanilla extract, and eggs in a large mixing bowl with an electric mixer at medium speed until light and creamy.
  3. Mix flour, baking soda, and salt together in a separate bowl.
  4. Slowly blend the dry ingredients into the creamed mixture, mixing on a slow speed until blended.
  5. Mix in the M&Ms and place on an ungreased cookie sheet.
  6. Bake 10 - 12 minutes. cool slightly and place on cooling rack.

Chewy Chocolate Cookies

1 1/4 cup butter
2 cups sugar
2 eggs
2 tsp vanilla extract
2 cups flour
3/4 cup cocoa
1 tsp baking soda
1/2 tsp salt

  1. Preheat the oven to 350°F
  2. Cream the butter, sugar, eggs and vanilla in a large mixing bowl, with an electric mixer on medium speed until light and creamy.
  3. Combine flour cocoa, baking soda, and salt in a separate bowl.
  4. Slowly combine the dry ingredients with the creamed mixture until blended.
  5. Drop by rounded tsp onto an ungreased cookie sheet.
  6. Bake for 9-10 minutes.
  7. Cool slightly on cookie sheet, and move to a cooling rack.

A Little About Myself

First of all.. I would like to welcome you to my blog. I am very excited about getting started. My name is Katie and I love to cook. I feel that the kitchen is a magical place. You can take ingredients that otherwise be boring and transform them into a delicious meal. I also love to try kitchen gadgets, they make life easier and are so much fun! I am a twenty year old nursing student. I am originally from Indiana but I currently reside in sunny Florida. I have been cooking for years from attending vocational school to working in restaurants and of course cooking for family and friends. I look forward to sharing my favorite recipes, different cooking skills, and my kitchen gadget addiction with you. Cooking can be fun for all ages and can be an excellent way to bond. So get in the kitchen and start cooking!